Showing posts with label Treats. Show all posts

Fresh Fruit Popsicles

I don't know about you, but once it hits a certain point in summer, I'm ready for cooler temps and fall. However, as a teacher, I also am torn because I don't want to wish summer vacation away. It's been HOT here. We've been doing everything we can to cool off including lots of trips to a little local lake and the community pool. Gabe has become a water bug and it's a lot of fun! Another thing we love to do as a family is share popsicles. However, I know how much sugar can be in the freezie pops that Gabe loves, so I came up with an alternative.

These homemade popsicles have chunks of mango, slices of kiwi and strawberry, and blueberries in them. They hit the spot on a hot day and they're toddler and husband approved.


Ingredients

  • 2 Tbsp raw honey
  • 1/2 cup water
  • 1/2 mango, sliced
  • 1 medium kiwi, peeled and sliced
  • 1/4 cup strawberries, sliced 
  • 1/4 cup blueberries
  • 1/4 cup fresh lime juice

Instructions

  • Heat up honey and water in a small pan on the stove over medium-high heat. Heat, stirring frequently for 5 minutes, until the honey and water are well blended. Cool to room temperature.
  • While water cools, even distribute fruit into four popsicle molds, set aside
  • Pour the lime juice into the water/honey mixture, stir until combined 
  • Pour lime juice mixture into the molds, covering the fruit. Freeze for at least 4 hours, or until set. 

I hope these help cool your family off on a hot day! Enjoy!

Frozen Yogurt Bites

Frozen yogurt is a favorite summer treat. I love sampling flavors and putting toppings on. I mean with fruit and chocolate how can you go wrong?!

These strawberry frozen yogurt bites are just as delicious and you don't have to go out to grab a froyo treat when these are in your freezer! Plain greek yogurt is the main star in this recipe, but the pecan, coconut sugar, and coconut oil crust is DIVINE!


Frozen Yogurt Bites, Serves 6 

Ingredients
  • 1/2 cup pecans, chopped
  • 1 Tbsp Coconut Sugar
  • 1 Tbsp Extra Virgin Coconut Oil, Melted 
  • 1/2 tsp ground cinnamon
  • 3/4 cup plain greek yogurt (0% or 2%)
  • 2 Tbsp raw honey 
  • 1 1/2 cup strawberries, diced 

Instructions
  • Line muffin tin with 6 parchment cupcake liners, set aside 
  • Combine pecans, sugar, oil, and cinnamon in a blender or food processor, pulse till combined
  • Divide mixture evenly among prepared muffin cups, press in gently to set 
  • Combine yogurt and honey in a small bowl, mix well 
  • Evenly top pecan mixture with yogurt mixture 
  • Top with strawberries 
  • Freeze until firm (4-6 hours) 

Tip: When removing from the muffin tin, gently set tin in warm water for 30 seconds. This makes them easier to remove.

You don't have to limit your toppings to strawberries, either! Mix it up with your favorite fruit or chocolate treat. Have fun!


Almond Flour Chocolate Chip Cookies

Dark chocolate, walnuts, and almond flour make a delicious cookie with a great texture. They're gluten free, and use pure maple syrup to sweeten. They help curb my sweet tooth cravings and are DEFINITELY a bit of a healthier version of the original chocolate chip cookies we all love. Nate and Gabe actually prefer these to my normal chocolate chip cookies. So they're a hit with all ages! 


Almond Flour Chocolate Chip Cookies

Ingredients

  • 1/4 cup coconut oil, room temperature 
  • 1 large egg 
  • 2 egg whites 
  • 1/4 cup pure maple syrup 
  • 1 tsp vanilla extract (I always let a little bit run over the tsp) 
  • 1/4 tsp almond extract (I let this one run over a little bit too) 
  • 3 cups almond flour 
  • 1 tsp baking soda
  • 1/2 tsp sea salt 
  • 1 cup dark chocolate chips (60% or greater Cacao)
  • 1/2 cup chopped walnuts 

Instructions

  • Preheat oven to 375 and line two baking sheets with parchment paper 
  • Combine dry ingredients (almond flour, baking soda, sea salt), mix, and set aside 
  • Mix coconut oil and pure maple syrup in a mixer for about 5 minutes. 
  • Add whole egg, egg whites, and your vanilla and almond extracts, mix for 2 more minutes 
  • Slowly add dry ingredients to wet ingredients, mix until just combined 
  • Add in chocolate chips and walnuts, mix until well combined
  • Use a tablespoon and place large, rounded tablespoons on your prepared baking sheets 
  • Using the back of the spoon lightly flatten each ball of dough 
  • Bake for about 15 minutes, until golden brown

They're fairly easy and pretty quick. If you're in the mood for cookies, these are a great option. Store in a sealed container on at room temperature for about a week. Enjoy!

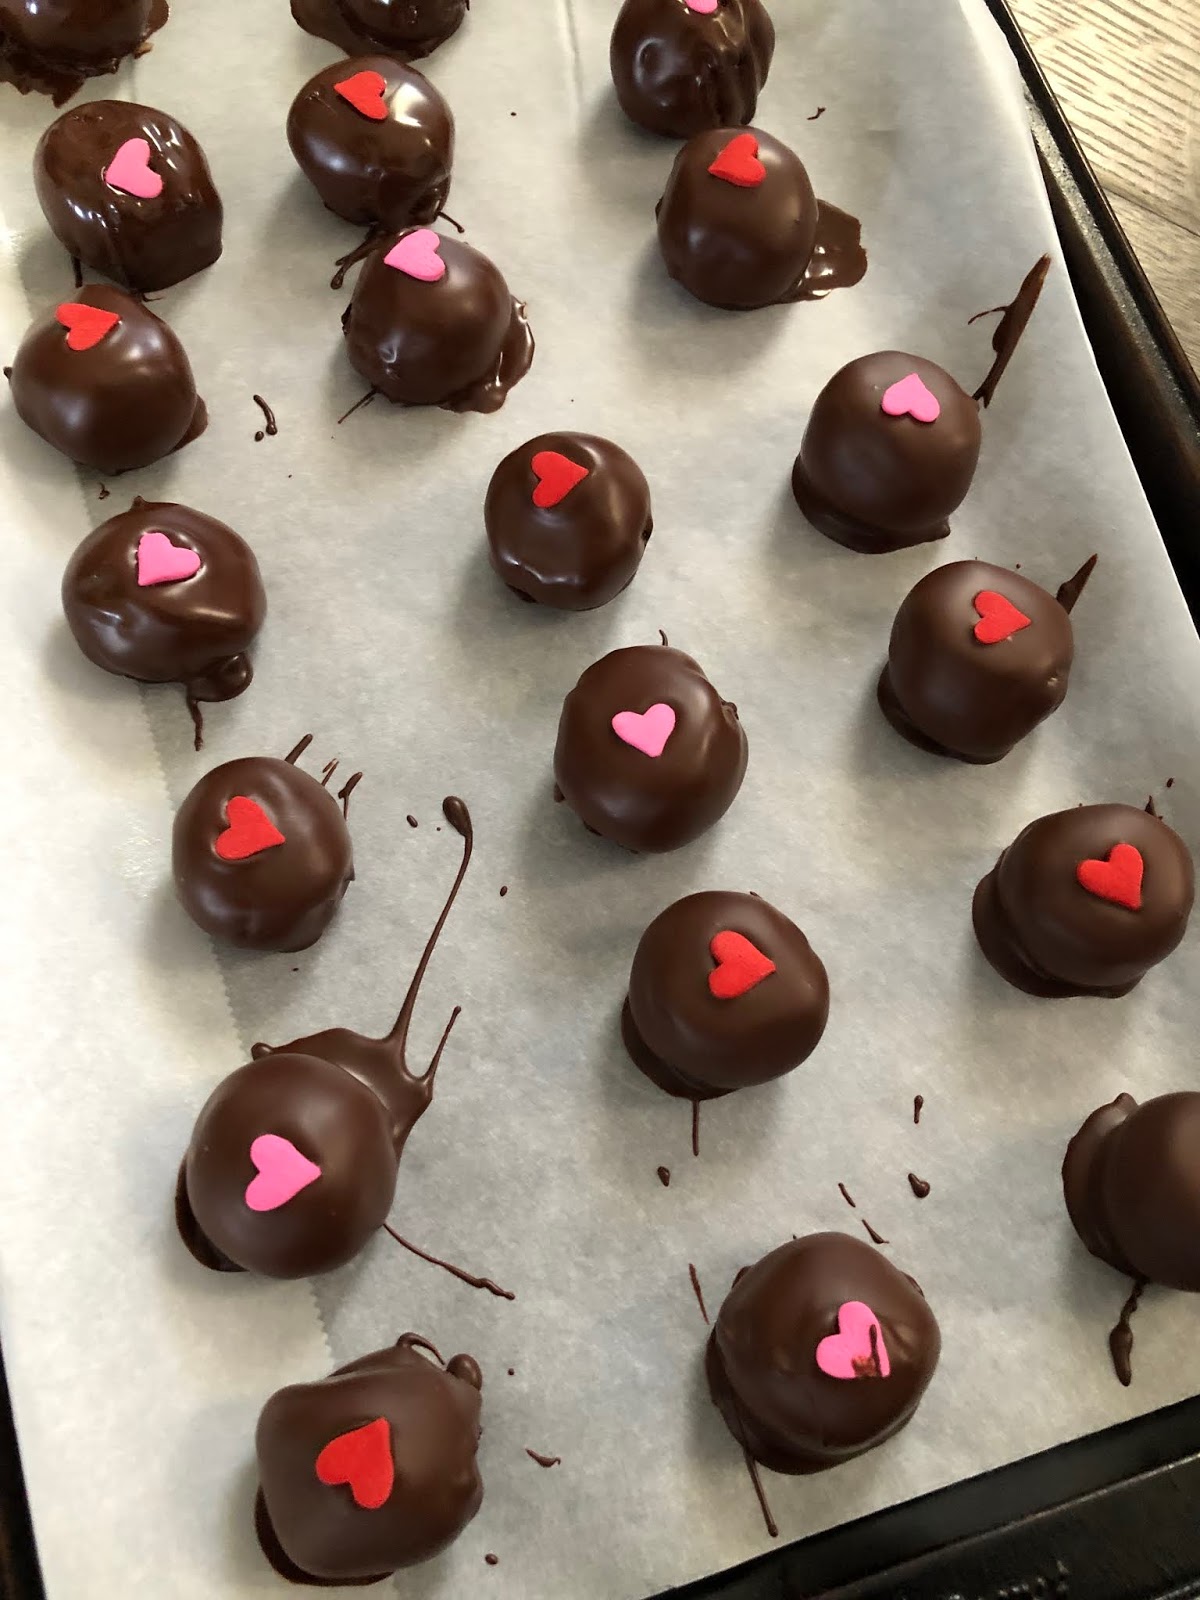
No Bake Chocolate Covered Peanut Butter Balls

Who doesn't love to indulge in dark chocolate every once in a while? Chocolate peanut butter balls were always a staple for my family around the holidays. However, they were definitely loaded with sugar. This is a healthier take on that same treat. Made with coconut flour and sweetened with pure maple syrup, these are just as tasty. They're perfect for holidays--or just when you're craving chocolate and peanut butter (aka--all the time if you're me.)


Ingredients
  • 1 cup creamy all-natural, peanut butter
  • 3/4 cup coconut flour
  • 1 Tbsp cornstarch 
  • 2 Tbsp pure maple syrup 
  • 2 cups dark chocolate chips (60% + Cacao) 
  • 2 tsp coconut oil 

Instructions

  • Line a large baking sheet with parchment paper
  • Combine peanut butter, coconut flour, maple syrup and cornstarch until a dough forms
  • Wash hands and shape dough into 18-20 one inch balls, place on baking sheet
  • Refrigerate for 20 minutes 

  • After balls are thoroughly chilled, melt chocolate and coconut oil together (30 seconds at a time, stirring in between)
  • Remove balls from the refrigerator, dip into the chocolate (using a fork) and completely coat with chocolate. 
  • Return ball to baking sheet, repeat until finished with the remaining peanut butter balls
  • (Add decorations for fun)
  • Refrigerate for 1 hour 
  • Store in an airtight container in the refrigerator 
  • ENJOY! 
Happy Valentine's Day!

Chocolate Peanut Butter Energy Bites

We make these every weekend. Gabe loves to help and Nate takes a couple in his lunch every day. They satisfy my sweet cravings without me feeling like I've gone overboard. All of the ingredients are pretty healthy so I'd say it's a win all around. Many people have reached out to ask for this recipe, so I'm happy to share it here!


Energy Bites

Ingredients


  • 1 1/2 cups old-fashioned, rolled oats 
  • 1/2 cup natural peanut butter (look for peanut butter that has only peanuts listed in the ingredients) 
  • 1/3 cup pure maple syrup 
  • 1/3 cup Dark Chocolate Chips (60%+ Cacao, or Cacao Nibs) 
  • 2 Tbsp Flax Seeds 

Instructions

  • Mix all ingredients together until thoroughly combined 
  • Cover and chill in the refrigerator for 1-2 hours 
  • Remove and roll into 18-20 energy balls 
  • *Tip* dip your fingertips in water so the mix doesn't stick as much when you roll them into the bites.

I hope you enjoy these as much as we do! You can definitely use Cacao Nibs in place of the dark chocolate or Chia Seeds in place of the Flax. We use Dark Chocolate chips because they have a milder flavor and Gabe loves to eat them for a snack too!

Almond Flour Sugar Cookies

With the holidays quickly approaching, I've got the baking bug. There are are a few things I make each year to share with friends and family. I always say that if baking for others is a love language, it's totally mine. I love to bake and gift the goodies I make. My husband loves pretzel treats... you know the ones I'm talking about. The ones with zero baking involved. Pretzels, rolos, and an almond m&m on top. Easy and done in about 10 minutes. I also make my great-grandma's Italian Spritz Butter Cookies. These are something that I'm definitely going to indulge in. They've been a favorite since I was a very very little girl. I also love to make and decorate sugar cookies. Sugar cookies with frosting are delicious, but sometimes can be a little TOO sweet for my taste. So, I've found a healthier alternative: Almond Flour Sugar Cookies with a Dark Chocolate Drizzle.


Ingredients
  • 2 cups almond flour (sift after measuring) 
  • 1/8 tsp sea salt 
  • 1/8 tsp baking soda 
  • 4 Tbsp pure maple syrup 
  • 2 Tbsp extra virgin organic coconut oil, melted 
  • 2 tsps pure vanilla extract 
  • 1 Tbsp unsweetened vanilla almond milk 
Instructions


  • Combine (sifted) almond flour, salt, and baking soda in a medium mixing bowl, mix well. Set aside 

  • Combine maple syrup, oil, and vanilla extract in a small bowl, mix well. 
  • Add wet ingredients to dry ingredients to dry ingredients, mix well. 
  • Add milk slowly, mixing to break up any clumps of dough there may be. 
  • Form dough into a ball (add almond flour to hand before forming so dough doesn't stick) 
  • Roll dough into a log, refrigerate 4-5 hours or overnight. 

  • Cut log into slices, place on a baking sheet prepared with parchment paper or sprayed lightly with cooking spray. 

  • Bake for 8-10 minutes, until set 
  • Cool for 10 minutes on the baking sheet. Remove from cookie sheet and cool completely on a wire rack. 
  • Melt dark chocolate and use a spoon to drizzle over the cookies. Refrigerate to set the chocolate. 


Keep in a sealed container (add a slice of bread underneath a piece of paper towel as a trick to keep them moist and soft). Happy Holidays 2018!!

Homemade Coconut Dark Chocolate Bars

These homemade dark chocolate and coconut bars are healthy and hit the spot... Especially when you're craving something sweet. There are only 6 ingredients (I promise you can name all of them!) and they're super easy-to-make, which makes them even better in my book. They're also husband and toddler approved! 


Ingredients

  • 2 cups of medjool dates, pitted and chopped
  • 1/2 cup raw almonds 
  • 1/2 cup raw, unsalted peanuts
  • 1/2 cup unsweetened, shredded coconut 
  • 1 1/2 Tbsp unsweetened cocoa powder 
  • 1/2 cup dark chocolate chips (60%+ Cacao) 


Instructions
  • Chop and pit dates
  • Combine dates and all other ingredients in a large blender or food processor 
  • Pulse then blend until all ingredients become smooth and form a large lump
  • Line an 8x8 pan with parchment 
  • Remove ingredients from blender/food processor and press into the pan 

  • Refrigerate for 30 minutes until firm 
  • Cut into squares 
  • Keep in an airtight container in the refrigerator for up to a week 
When you make these you're guaranteed to have a healthy snack to reach for in the fridge. We love having them on hand! Hope you enjoy! If you try them please leave a comment and let me know what you think! 

Pumpkin Sandwich Cookies

Who doesn't love a good cookie? In an attempt to make a healthier version of a whoopie pie, I ended up creating what Nate called a sandwich cookie. He was the first to tell me that "these are not whoopie pies, but they're delicious." So, sandwich cookie it is! I like to think of this as a happy accident. I love the texture, especially with the oats and chopped pecans. YUM! They're also a cookie you can feel a little less guilty about having as a treat. Without further ado, here's the recipe!


Ingredients for Cookies:
  • 1 cup dry old-fashioned rolled oats
  • 1/2 cup all-purpose flour
  • 1/2 tsp ground cinnamon
  • 1/4 tsp baking powder 
  • 1/4 tsp sea salt
  • 1/4 cup extra virgin coconut oil 
  • 1/4 cup coconut sugar
  • 1 large egg 
  • 1/2 tsp pure vanilla extract 
  • 1/2 cup chopped pecans

Ingredients for Pumpkin Filling

  • 1/4 cup heavy whipping cream 
  • 1/2 tsp unflavored gelatin
  • 1/2 cup pure pumpkin puree
  • 2 Tbsp coconut sugar 
  • 1 pinch sea salt 
  • 1/4 tsp ground cinnamon 
  • 1/4 tsp ground ginger
  • 1/4 tsp ground nutmeg 
  • 1/2 tsp pure vanilla extract

Instructions for Cookies
  • Preheat the oven to 350º F
  • Line a baking sheet with parchment paper, lightly coat with cooking spray 
  • Combine oats, flour, cinnamon, baking powder and salt in a large bowl; mix well, set aside
  • Combine oil and sugar in a mixing bowl; beat until light and fluffy (about 3-5 minutes) 
  • Add egg and extract; beat until well blended 
  • Gently fold in oat mixture using a spoon (or clean hands); mix until just blended
  • Fold in walnuts
  • Spread 16 round Tbsp of dough onto prepared baking sheet, lightly press down for a flatter cookie shape 
  • Bake 15 to 18 minutes, rotating the baking sheet once halfway through, cookies should be a golden brown when done. 
  • Cool cookies completely before filling (you don't want the hot cookie to melt the delicious filling!!) 
Instructions for Pumpkin Filling

  • While your cookies are baking, combine cream and gelatin in a large mixing bowl, whisk to blend. Let stand for 5 minutes
  • Add pumpkin, coconut sugar, salt, cinnamon, ginger, nutmeg, cloves, and extract to cream mixture; whisk to blend. 
  • Add pumpkin mixture to a large skillet. Bring to a boil over medium heat, stirring constantly
  • Reduce heat to medium-low; continue to cook for 3 to 5 minutes until mixture has thickened slightly (stirring constantly) 
  • Place pumpkin mixture in a heat-proof bowl (I used my Pyrex!), then place bowl in an ice bath. Chill for 10 to 15 minutes, or until pumpkin mixture has set to a pudding-like consistency 
  • Transfer pumpkin filling to a piping bag (or a large plastic bag). Refrigerate until it's time to fill the cookies.

Instructions for the Sandwich Cookies

  • Pipe approximately 1 Tbsp of filling on flat bottom of a cookie 
  • Press another cookie on top to form a sandwich 
  • Continue with the remaining cookies 
  • Store in an air-tight container for up to 4 days

I hope you all enjoy these sandwich cookies as much as we do! They may not be whoopie pies, but they are definitely a delicious treat! They come in at only 220 calories and only have 9g of sugar so they're able to be enjoyed with a lot less guilt.

As always, let me know if you try them!


Carrot Fries

When we go out to eat at a restaurant french fries are something I love to treat myself with. Admittedly, they're my weakness. I LOVE any type of fry but I especially love Sweet Potato Fries. I also love that they're somewhat of a healthy alternative to regular, deep-fried french fries. They were my go-to at restaurants and I was always on the hunt to find the best ones in town. They were also our go-to when we grilled burgers. Until I met the carrot fry. I tried a few recipes and finally tailored one to my liking. I don't even miss regular fries OR sweet potato fries now. These are so delicious that they hit the spot. They're crispy, have a punch of flavor, and come with a side of greek yogurt dipping sauce. Win, win, win! 


Carrot Fries (serves 2)

Ingredients: Carrot Fries:
4-6 Large Carrots
1 ½  Tbsp Olive Oil
2 tsp garlic powder
½ tsp pepper
¼ cup grated parmesan cheese

Dipping Sauce:
4 Tbsp Greek Yogurt (0% plain)
1 Tbsp Lemon Juice
½ tsp minced garlic
½ tsp pepper

Instructions Dipping Sauce:
  • Place all ingredients into a bowl and stir to combine
Instructions Carrot Fries:
  • Preheat oven to 450°
  • Line baking sheet with parchment paper
  • Slice the top and bottom off of carrots then slice them in half, slice each half into thirds lengthwise.
  • In large bowl mix together oil, garlic powder, pepper, and parmesan cheese with carrots
  • Once thoroughly seasoned, move the carrots from the bowl to the parchment-lined baking sheet, place in the oven 
  • Bake for 25-30 minutes (flipping/stirring at 15 minutes), depending on how crispy you want them.
  • Serve with dipping sauce

These are honestly one of my favorite side dishes to serve when grilling food. We've shared the recipe with our families who also wholeheartedly approve. I can't wait for you to try them! 


Vegan Peanut Butter Chocolate Cheesecakes

Peanut butter and chocolate. Honestly, is there a better combo? This is one of my biggest cravings, so I love to try to incorporate it when I can. I always tell Nate I have a peanut butter problem. If you love peanut butter and chocolate as much as me, you've got to try these vegan, raw cheesecakes!


Ingredients
  • 1/3 cup raw, unsalted peanuts
  • 2/3 cup raw almonds 
  • 1/2 cup unsweetened coconut flakes
  • 8 medjool dates, pitted and chopped
  • 2 tablespoons unsweetened cocoa powder
  • 1 cup raw cashew pieces, soaked overnight and drained
  • 1 cup unsweetened vanilla almond milk 
  • 1/4 cup melted coconut oil
  • 1/3 cup pure maple syrup 
  • 1/4 cup unsweetened cocoa powder
Instructions

  • Line a muffin tin with cupcake liners 
  • For the crust
    • pulse peanuts, almonds, coconut flakes, dates, and 2 tablespoons cocoa powder in a food processor or blender until crumbly and it holds together when pressed. 
    • **Do not over pulse or the crust will become too soft and chewy. Ideally you would like a bit of crunch for the texture. 
    • Press tablespoons of this mixture into the bottom of the lined muffin tins. Place in the freezer and clean the blender.

  • For the filling: 
    • puree the soaked cashews, coconut oil, almond milk, and maple syrup until smooth. Remove muffin tin from the freezer Spoon half of this mixture onto the crusts. This is the peanut butter portion of your cheesecake
    • Place back into the freezer (these will set quickly)
    • Add 1/4 cup cocoa powder to the peanut butter mixture in the blender, and blend until combined. 
    • Remove cheesecakes from the freezer and spoon and smooth the chocolate filling on top of the peanut butter layer. Decorate with halved peanuts (optional).

  • Place back in the freezer until ready to eat. 
I recommend taking these out about 10 minutes before serving them. I also recommend using your fingers to eat them! They get a bit crumbly when serving with a fork. Although, if you want to eat them straight from the freezer they're like an ice cream treat!

These cheesecakes definitely a good way to treat yourself! They're rich and decadent without refined sugar and processed ingredients.

I think you'll love these!

Fall Football Series: Gluten Free Vanilla Cupcakes with Buttercream Frosting

Baking is my favorite. I absolutely LOVE to bake. It is a huge stress reliever for me. It also is something fun to do with Gabe. He enjoys dumping all of the ingredients into the mixer and counting how many things we need to put into the recipe! He also loves to peek through the oven door to make sure everything is going okay. I also adore decorating cupcakes and cakes. It's become a passion of mine. Cupcakes (and buttercream frosting) are totally my weakness. I wanted to make a healthier version of the cupcake so when we treated ourselves we could really love up on that buttercream. (I was not about to sacrifice that frosting.) So to round out this Fall Football Series, I have our dessert: Gluten Free Vanilla Cupcakes with Buttercream Frosting


Cupcake Ingredients
  • 1 Cup Almond Flour 
  • 1/2 Cup Coconut Flour 
  • 2 tsp Baking Powder (gluten free) 
  • 1/4 tsp Sea Salt 
  • 1/2 Cup Unsalted Butter 
  • 3/4 Cup Coconut Sugar
  • 4 Large Eggs 
  • 1/4 Cup Unsweetened Vanilla Almond Milk
  • 1 tsp Pure Vanilla Extract
Frosting Ingredients 
  • 1 Cup (2 sticks) of Unsalted Butter
  • Powdered Sugar (see instructions for amounts) 
  • Splash of Almond Milk 
  • 1 tsp Pure Vanilla Extract
  • 1 tsp Pure Almond Extract 

I'm going to take you step-by-step exactly how I make these cupcakes. Let's jump right in!


Instructions (Cupcakes)
  • Preheat oven to 350°F
  • Place cupcake liners into you baking pan. Set aside. 
  • Combine almond flour, coconut flour, baking powder, and salt in a medium bowl; mix well. set aside. 
  • Cream together 1/2 cup unsalted butter and coconut sugar in a mixing bowl; beat on medium speed for approximately 1 minute. 
  • Add eggs one at a time; beat until well blended 
  • Add 1/4 cup almond milk and extract; beat until blended
    The mixture will look watery--do not worry! 
  • Add almond flour mixture to butter mixture slowly; beat until creamy; scraping the sides of the mixing bowl as needed.
  • Spoon batter into prepared cupcake pan; filling liners about 3/4 full.  
  • The batter is a bit sticky. Spoon it into the cupcake liners and gently smooth the tops as best as you can 
  • Bake for 25 to 30 minutes, or until a toothpick inserted into the center comes out clean. 
  • After 5 minutes transfer to cool on a baking rack. 


The tops of the cupcakes come out a bit bumpy, but, that's okay because, well... FROSTING! Which is my favorite part. It's definitely a treat, so I make sure to enjoy every second of it.

Instructions (Frosting)

  • Cream Butter in mixer until very smooth. 
  • Add Powdered Sugar 1/2 cup at a time, blending each 1/2 cup into the creamed butter until smooth. 
  • After about 1 1/2 cups of powdered sugar, add in almond and vanilla extract, mix in. 
  • Continue adding powdered sugar (We normally do 3-3 1/2 cups) to taste. 
  • Add in a splash of almond milk (about 1 Tbsp) and blend. 
  • Now you're ready to frost! I love using piping bags and piping tips, but you can spread it on with a knife too. Enjoy!!


    If you enjoy these cupcakes, please let me know! I love hearing from those who are reading the blog!